Unlocking the Secrets to an Incredibly Moist Chocolate Cake
Master the Art of Choosing the Best Flour and Leavening Agents for Your Cake
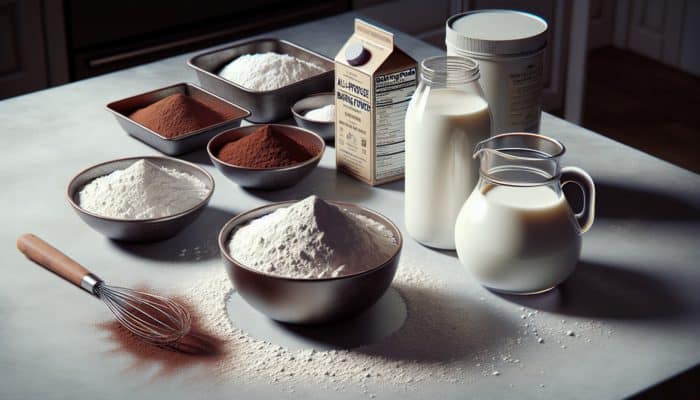
To achieve a truly moist chocolate cake, meticulously selecting the right flour and leavening agents is paramount. Typically, all-purpose flour is the ideal choice due to its balanced protein content, which contributes to a cake crumb that is both airy and tender. Steer clear of high-protein alternatives like bread flour, as they may result in a denser cake than intended. Furthermore, your choice of leavening agents is crucial; using a combination of baking soda and baking powder is essential for achieving the perfect lift. Baking soda pairs wonderfully with acidic elements like buttermilk or cocoa powder, whereas baking powder is reserved for recipes that lack acidic components.
A prevalent mistake to avoid is inaccurate flour measurement, which can lead to a dry cake. For accurate measurement, gently spoon the flour into your measuring cup without packing it, and then level it off for precision. For a standard 9-inch cake, aim for about 1 ¾ cups of flour. If baking at a higher altitude, remember to adjust the ratios of your leavening agents to ensure the perfect rise suited to your environment.
The Crucial Role of Sugar and Sweeteners in Your Cake Recipe
The choice and amount of sugar are vital in determining the moisture and sweetness of your chocolate cake. While granulated sugar is the conventional option, adding brown sugar can significantly boost moisture and introduce a rich, caramel-like flavor that enhances the cake’s complexity. The moisture-retaining properties of brown sugar, due to its molasses content, yield a chewier texture, making it an excellent selection for decadent chocolate cakes.
For the best results, consider mixing various types of sugars. For example, combining equal parts granulated and brown sugar can create a delightful equilibrium between sweetness and moisture. You might also explore alternative sweeteners such as honey or maple syrup, which can add unique flavors but may require adjustments to the recipe’s liquid content and baking duration. As a general guideline, substitute 1 cup of granulated sugar with about ¾ cup of honey, while reducing other liquid ingredients by roughly ¼ cup to keep the cake’s moisture intact.
Utilizing Fats and Oils to Enhance Moisture in Your Cake
The inclusion of fats in your cake recipe is essential for ensuring a moist outcome. Traditional recipes often call for butter, which imparts a rich flavor and bolsters the cake’s structure. However, substituting oil can substantially improve moisture retention, as oil remains liquid at room temperature unlike butter. A combination of both fats may yield the best results, balancing richness and moisture for an outstanding cake.
When choosing fats, unsalted butter is generally preferred, as it allows for better control over the cake’s salt level. If you opt for melted butter instead of softened butter, take care not to overmix, as this can lead to a denser cake. Aim to incorporate around ½ cup of fat into your recipe, adjusting according to your taste preferences. For a healthier option, consider substituting some butter with applesauce or yogurt, which can increase moisture without adding extra fat.
Understanding the Essential Role of Eggs and Dairy in Cake Baking
In any cake recipe, eggs serve a foundational purpose, providing structure, moisture, and richness. The proteins found in eggs help bind the ingredients together, resulting in a stable structure for your cake. For a moist chocolate cake, it is advisable to use large eggs and incorporate them at room temperature to ensure even mixing and optimal rise.
Dairy ingredients like milk or buttermilk further enhance the cake’s richness and tenderness. Full-fat dairy products are ideal for achieving the best results, as they contain more fat, contributing to a moist cake crumb. Buttermilk not only adds creaminess but also reacts with baking soda, giving additional lift and a slight tang that beautifully complements the chocolate flavor. Typically, aim to use around one cup of dairy in your recipe. If you prefer non-dairy options, alternatives like almond milk or oat milk can work effectively, although they may subtly modify the final texture of the cake.
Choosing High-Quality Cocoa and Chocolate for Enhanced Flavor
The quality of cocoa powder and chocolate you select is instrumental in attaining the depth of flavor desired in your cake. For an intense taste and dark color, consider using Dutch-processed cocoa, which is less acidic and integrates seamlessly with baking powder. On the other hand, natural cocoa is more acidic and yields a lighter color, ideal for recipes that already include baking soda.
When adding cocoa to your batter, it’s crucial to sift it along with the dry ingredients to avoid clumping. A typical ratio for a standard 9-inch chocolate cake is around ¾ cup of cocoa powder. If you prefer using solid chocolate, opt for high-quality dark chocolate with at least 70% cocoa content to achieve a more intense chocolate experience. Always melt chocolate carefully to prevent scorching, typically using a double boiler or microwave in short intervals for even melting.
Proven Techniques for Baking the Perfectly Moist Chocolate Cake
What is the Best Method for Selecting Cocoa Powder?
The selection of cocoa powder is crucial in defining the flavor and appearance of your cake. Dutch-processed cocoa undergoes treatment with an alkalizing agent that neutralizes its acidity, resulting in a smoother, richer taste and a deeper color. In contrast, natural cocoa powder retains its acidity, resulting in a lighter color and a more pronounced chocolate flavor that can beautifully enhance specific recipes. Understanding these differences enables you to choose the best cocoa for your cake creation.
- Dutch-processed cocoa: Less acidic, darker color, smoother flavor.
- Natural cocoa: More acidic, lighter color, stronger chocolate flavor.
- Versatility: Dutch-processed cocoa pairs well with baking powder, while natural cocoa is suitable for baking soda use.
- Taste tests: Experiment with both types in various recipes to discover your personal preference.
When selecting cocoa powder, consider the brand as well; some brands are known for their superior flavor profiles. Look for cocoa that is rich and dark, avoiding products with unnecessary additives or fillers. Ultimately, the right cocoa powder can elevate your cake from ordinary to extraordinary.
Mixing Techniques for Crafting the Perfect Cake Batter
The method you use to mix your ingredients can significantly affect the texture of your cake. Overmixing can create a dense, tough cake by developing excessive gluten, while undermixing can lead to an uneven batter filled with lumps. A gentle folding technique is often the best approach for maintaining a light and airy texture in your cake. Begin by creaming your butter and sugar together until light and fluffy, then gradually add in the eggs one at a time, ensuring each one is fully incorporated before proceeding to the next.
Once you introduce your dry ingredients and liquids, mix just until everything is combined. A few lumps are acceptable; it’s better to err on the side of caution to prevent overmixing. If you plan to fold in chocolate chips or nuts, do so gently at the end to ensure even distribution without deflating the batter. Using a rubber spatula for this process facilitates easier folding while keeping air in the mixture.
How to Determine the Ideal Baking Temperature and Time for Your Cake
The baking temperature is crucial for achieving a perfectly moist chocolate cake. A moderate oven temperature of about 180°C (350°F) is recommended for baking chocolate cakes, as it promotes even cooking without burning the edges. Baking times can vary considerably depending on your oven and the type of pan used; however, a standard 9-inch round cake typically requires around 30 to 40 minutes. It is essential to check the cake for doneness a few minutes before the minimum baking time.
To test your cake, insert a toothpick into the center; it should come out with a few moist crumbs, indicating it is perfectly baked. If it emerges clean, the cake may be overbaked, leading to dryness. Additionally, if you observe your cake rising too quickly and then collapsing, it suggests that your oven temperature is too high. Consider investing in an oven thermometer to ensure accurate baking temperatures, as many home ovens can deviate by several degrees.
How to Integrate Moisture-Retaining Ingredients for Improved Texture
Incorporating moisture-retaining ingredients can significantly enhance the texture and flavor of your cake. Ingredients such as sour cream, buttermilk, or even mayonnaise can boost moisture levels while adding a subtle tang that harmonizes beautifully with the chocolate flavor. For instance, adding ½ cup of sour cream can yield a richer, denser cake that stays moist even days after baking.
These ingredients not only enrich the batter but also help retain moisture during the baking process. It’s advisable to replace a portion of your liquids with these moisture-enhancing ingredients; for example, swapping out half of the milk for buttermilk can yield excellent results. However, be cautious with the ratios; using too much liquid can result in a batter that doesn’t rise properly. Start with small adjustments and gradually increase based on the outcomes you observe.
What Strategies Can Help You Maintain Moisture in Your Cake After Baking?
How to Effectively Utilize Moisture-Retaining Ingredients
To ensure your cake retains its moisture even after baking, consider incorporating ingredients such as sour cream, yogurt, or buttermilk. These components not only elevate the cake’s moisture content but also contribute to a tender crumb, making each slice rich and satisfying. For example, adding ½ cup of sour cream or buttermilk to your batter can work wonders, particularly in cakes that require a denser structure, like chocolate cakes.
Moreover, these moisture-retaining ingredients help preserve the cake’s tenderness even after a few days. The slight acidity from buttermilk or yogurt can create a chemical reaction with baking soda, yielding an even better rise and texture. When using these ingredients, remember to adjust the liquid ratios accordingly to maintain balance in your batter.
What Are the Proper Storage Techniques to Keep Your Cake Moist?
To maintain your cake’s moisture, proper storage techniques are crucial. After baking, allow your cake to cool completely before storing it. For short-term storage, keep it in an airtight container at room temperature for up to three days. If you wish to prolong its shelf life, refrigeration is an option, although it may slightly alter the texture. When refrigerating, wrap the cake tightly in plastic wrap or place it in a well-sealed container to prevent it from drying out.
For long-term storage, consider freezing your cake. Slice it into portions and wrap each piece in plastic wrap, followed by aluminum foil. This method can preserve the cake’s freshness for up to three months! When you’re ready to enjoy it again, simply thaw the cake at room temperature. This process helps retain moisture and freshness, making it taste just as delightful as when it was first baked. Remember not to refreeze any cake that has been thawed, as this can adversely affect its quality.
Avoiding Common Mistakes When Baking Your Cake
One of the most frequent mistakes when baking a chocolate cake is overbaking, which can lead to a dry and crumbly texture. To prevent this, closely monitor your cake as it approaches the end of its baking time. Checking for doneness with a toothpick is a reliable method; insert it in the center of the cake and remove it. If it comes out clean or with a few moist crumbs, your cake is ready. If it emerges with wet batter, it requires a few more minutes in the oven.
Another common error is unmolding the cake too early, leading to breakage. Allow your cake to cool in the pan for about 10 minutes before transferring it to a wire rack. This cooling period helps solidify the structure, making it easier to handle. Lastly, avoid substituting ingredients without understanding their roles; for example, using a non-fat dairy product could adversely affect the moisture level of your cake. Each ingredient plays a vital role in the final outcome, so it’s essential to follow the recipe closely for the best results.
What Are the Best Strategies for Successfully Baking a Moist Chocolate Cake?
How to Choose the Right Pan for Baking
The type of pan you choose can significantly impact your cake’s baking process and overall outcome. A light-colored metal pan is generally the best option for ensuring even baking, as it distributes heat uniformly. Dark or non-stick pans may cause the edges to cook faster, potentially leading to dryness if not monitored closely. When selecting a pan, also consider its size and shape; a standard 9-inch round pan is popular for chocolate cakes, allowing for proper heat distribution and rising.
- Light-colored metal pans: Promote even baking.
- Dark pans: Can lead to overcooked edges.
- Size matters: Ensure the pan is the proper size for your recipe.
- Glass pans: Can also be used but may require adjustments in baking time.
Be sure to verify your oven’s temperature before baking to ensure optimal results. Additionally, consider the material; glass or ceramic pans may retain heat differently than metal, affecting baking time. Ultimately, selecting the right pan lays the groundwork for baking a moist and delicious chocolate cake.
How to Properly Prepare the Pan for Optimal Baking Results
Thorough preparation of the pan is critical in achieving a moist chocolate cake that doesn’t stick. Generously grease the pan with butter or a non-stick spray, ensuring that all sides are coated. For added security, consider lining the bottom with parchment paper; this makes it easier to release the cake after baking. Many bakers recommend employing both methods, as this combination provides the best chance of a clean release.
Another essential tip is to allow your pan to cool slightly after greasing. This can prevent the batter from setting too quickly upon contact, which may lead to uneven baking. When you pour the batter into your prepared pan, gently tap it on the counter to eliminate any air bubbles, promoting an even rise. With the right preparation, you’ll ensure that your cake bakes evenly and releases without hassle.
How to Cool and Handle Your Cake for Optimal Results
The cooling process is just as important as baking itself for retaining moisture in your cake. After removing your cake from the oven, allow it to cool in the pan for about 10 minutes. This initial cooling helps the cake settle and firm up, reducing the likelihood of breakage during removal. Next, carefully invert the pan onto a wire rack to allow the cake to cool completely.
Cooling on a wire rack is essential to avoid sogginess, as it promotes air circulation underneath. Handle the cake gently to avoid compromising the moist crumb; use a spatula or your hands to support the base. If your cake has a particularly delicate crumb, consider letting it cool in the pan longer before transferring it to the rack. Patience during this stage pays off, ensuring a beautifully moist cake that holds together perfectly when served.
What Are the Ideal Toppings to Elevate Your Moist Chocolate Cake?
How to Explore Various Frosting Options
Your choice of frosting can significantly enhance both the moisture and flavor profile of your chocolate cake. A rich chocolate ganache serves as an excellent option, providing an indulgent layer of moisture that beautifully complements the cake’s texture. To create a ganache, simply heat equal parts cream and chocolate until well combined; this delicious topping coats the cake while adding an extra layer of chocolate richness.
If you prefer a lighter option, a creamy buttercream can work wonders. Whipped cream frosting is especially delightful when paired with a denser chocolate cake, adding a touch of lightness while maintaining moisture. Consider flavor variations as well; incorporating vanilla or espresso into your frosting can enhance the overall taste and create a lovely balance to the richness of the chocolate. Aim for a frosting that complements rather than overshadows your cake; a well-balanced topping can elevate the entire eating experience.
How to Enhance Your Cake with Fresh Fruit and Nut Toppings
Adding fresh fruits or nuts can provide a delightful textural contrast while offering a refreshing balance to the rich chocolate cake. Berries like raspberries or strawberries add a tartness that cuts through the sweetness, while chopped nuts such as walnuts or pecans introduce a delightful crunch. These toppings serve not just as decoration but also enhance the overall flavor experience.
When adding fruits and nuts, consider their placement on the cake. Sprinkling them atop the frosting or layering them between cake layers can enhance both visual appeal and flavor. Additionally, consider drizzling a light syrup or glaze that complements the toppings; a simple fruit glaze can tie the elements together beautifully, creating a dessert that is as inviting as it is delicious.
How to Create Decorative Finishes for Visual Appeal
Enhancing your cake’s visual allure significantly boosts its overall presentation. Using chocolate shavings can create an elegant finish while adding an extra touch of chocolate flavor. Edible flowers can also provide a pop of color, transforming your cake into a stunning centerpiece for any gathering.
A light dusting of cocoa powder or powdered sugar serves as a simple yet sophisticated decorative finish. For a whimsical touch, consider themed decorations for special occasions, such as colorful sprinkles or festive candles. The goal is to create a dessert that is not only delicious but also visually enticing, encouraging everyone to indulge in a slice.
How to Use Syrup and Sauce Drizzles for Added Moistness
Increasing your cake’s moisture can also be accomplished with a drizzle of syrup or sauce. A rich chocolate syrup or a smooth caramel sauce can elevate the cake’s flavor while adding another layer of indulgence. Drizzling these sauces over the top or in between layers can create a delightful surprise when slicing into the cake.
When preparing the syrup, ensure it is not overly thick; a thinner syrup will penetrate the cake better, providing moisture throughout. Be mindful of the quantities used; too much syrup can lead to an excessively sweet or soggy cake, so begin with a modest amount and adjust based on your taste preferences. A well-executed drizzle can transform your chocolate cake from merely delicious to absolutely divine.
What Are the Exciting Variations and Add-Ins for Richer Flavor?
How to Enhance Your Cake with Chocolate Chips and Nuts
Incorporating extras like chocolate chips or chopped nuts can introduce exciting textures and flavor enhancements to your chocolate cake. These add-ins create pockets of melted chocolate and delightful crunch, enriching the overall cake experience. When adding chocolate chips, opt for semi-sweet or dark chocolate to maintain a balance with the cake’s richness.
When folding in these ingredients, do so gently to ensure even distribution without deflating the batter. Generally, using 1 to 1½ cups of chocolate chips or nuts works well for a standard cake. Consider toasting the nuts prior to adding them to the batter; this process can enhance their flavor and aroma, making your cake even more delicious.
What Flavors and Extracts Can You Incorporate for Added Depth?
Incorporating flavorful liquids and extracts can greatly enhance the chocolate taste in your cake. Adding brewed coffee can intensify the chocolate flavor, creating a richer and more complex profile. For a sweeter touch, adding vanilla extract can provide a lovely undertone that beautifully complements the chocolate. Typically, a tablespoon of vanilla extract is sufficient to make a noticeable difference.
Be cautious with the ratios; too much liquid can alter the cake’s texture. Start with small amounts and adjust based on your preferences. Additionally, consider mixing in a liqueur, such as Amaretto or Baileys, for an adult version of your cake. These flavor-packed additions can transform your chocolate cake into a truly memorable dessert.
How to Use Fillings for Extra Moisture and Surprise
Incorporating fillings can add both moisture and unexpected elements to your chocolate cake. Options such as fruit preserves, caramel, or even a rich chocolate mousse can create delectable layers of flavor in your cake. To incorporate, divide your batter and pour half into the prepared pan, layer your filling, then top it off with the remaining batter.
Alternatively, you can create a hollow in the center of your baked cake and fill it with your choice of filling. This method offers a delightful surprise when slicing into the cake. Ensure that the filling is not overly runny to avoid leaks that could compromise the cake’s structure. Adding fillings not only boosts moisture but also introduces a unique twist to the traditional chocolate cake experience.
Frequently Asked Questions
What is the secret to achieving a moist chocolate cake?
The key lies in using moisture-retaining ingredients like buttermilk, sour cream, or oil, combined with avoiding overbaking and ensuring proper storage after baking to maintain moisture.
Can I substitute oil for butter in a chocolate cake recipe?
Yes, you can replace butter with oil in chocolate cake; oil often results in a moister texture. Use a 1:1 ratio, but be aware that this substitution may slightly alter the flavor.
How long can I store a chocolate cake to keep it moist?
A chocolate cake can be stored in an airtight container at room temperature for up to three days or refrigerated for a week. For longer storage, consider freezing it.
What can I add to intensify the chocolate flavor?
Incorporating brewed coffee or espresso powder can significantly enhance the chocolate flavor. You can also use high-quality cocoa powder or dark chocolate for a richer taste.
Can I make a chocolate cake ahead of time?
Absolutely! Chocolate cakes often improve in flavor the next day. You can bake it in advance and store it properly until you’re ready to serve.
What type of cocoa powder is best for creating a moist chocolate cake?
Dutch-processed cocoa powder is commonly the best choice for a moist chocolate cake, as it provides a darker color and smoother flavor; however, natural cocoa can also work well, especially when balanced with baking soda.
How do I determine when my chocolate cake is done baking?
You can check for doneness by inserting a toothpick into the center; it should come out with a few moist crumbs, indicating that the cake is perfectly baked.
Is frosting necessary for a chocolate cake?
While frosting is not mandatory, it can enhance both the flavor and moisture of the cake. A ganache or buttercream can beautifully complement the chocolate.
Can I use gluten-free flour for this chocolate cake recipe?
Yes, you can use gluten-free flour, but ensure you select a blend that contains xanthan gum or a similar binder to help achieve the right texture.
What is the best method for adding chocolate chips to my cake batter?
Gently fold the chocolate chips into the batter at the end of mixing to avoid overmixing, ensuring they are evenly distributed for a delightful burst of chocolate in each slice.
Stay updated with our latest posts on Facebook!
The post How to Bake a Moist Chocolate Cake: Secrets Revealed appeared first on https://cookinggods.com
The Article Moist Chocolate Cake: Secrets to Perfect Baking Revealed Was Found On https://limitsofstrategy.com
The Article Moist Chocolate Cake: Discover the Secrets to Perfect Baking First Appeared ON
: https://ad4sc.com
No responses yet